I attended a quilting expo several years ago where you could find lots of new ideas for designing and creating beautiful quilts among other items.
One of the beautiful quilts that I saw was made using appliquéd flowers in each square.
I loved the look of this quilt with its precisely shaped appliquéd flowers.
I wondered how they were able to obtain such perfectly created flowers.
The answer was English paper piecing, something I definitely was not very familiar with.
I decided to look more into this age-old technique and to learn how to English paper piece.
It’s probably one of the most used ways to turn your on-the-go handwork into a beautiful quilt.
You can also make appliqués using this method that can be added to other projects as well.
You might be surprised, as I was, to find out that there are a whole lot of shapes that can be made with English paper piecing!
Shapes such as squares, circles, diamonds, triangles, honeycombs, that are then sewn together to make designs like butterflies, five-pointed stars, bees, umbrellas and dresses for instance.
I have found it to be a wonderfully fun and relaxing pastime for projects that I can take with me when I need an on-the-go project.
I’d like to share with you what I learned and have since experienced in my journey for learning how to English paper piece.
What Is English Paper Piecing
Simply put, English paper piecing is wrapping fabric around a paper template to make crisp shapes that are then sewn together, usually with a whip stitch to make your desired finished shapes and designs.
It really is that simple! Some English paper piecers like to use the flat back stitch but I’ve never tried it.
English paper piecing (or paper piecing) is a method of attaching and stabilizing pieces of fabric together, based on foundation piecing.
The practice’s name comes from the fact that it was, and still is, popular in Britain.
The technique used to paper piece involves wrapping paper shapes in fabric and then stitching the fabric together.
Once a shape, block, rosette, or finished piece has been made, the papers are removed, leaving the fabric as the remaining item.
Wikipedia
Quilts have been constructed using this English paper piecing technique for several centuries because of its ability for acquiring accuracy.
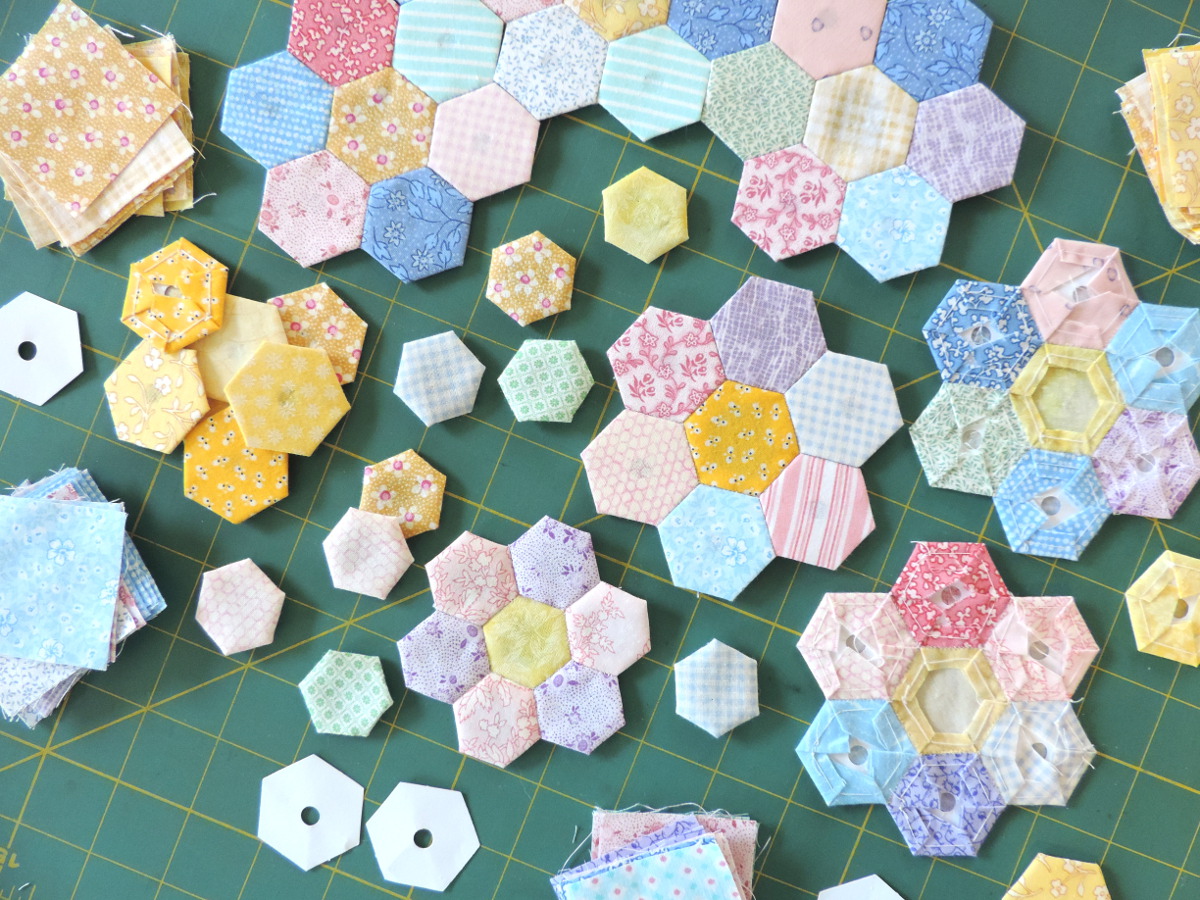
A Grandmother’s Flower Garden is a common quilt pattern that comes to mind for English paper piecing.
A quilt block like the Grandmother’s Flower Garden with it’s numerous set-in corners using hexagon shapes, English paper piecing is a most effective way to guarantee accuracy for these types of quilt blocks and quilt projects.
Is English Paper Piecing The Same As Foundation Paper Piecing
No, English paper piecing is not the same as Foundation paper piecing although they are similar.
English paper piecing is the practice of using a paper template cut to the exact size of the finished pieces for a quilt.
Then using the paper piece template as a guide, you cut the fabric about 1/4 to 3/8 inches larger than the size of the template.
Pinning or glue tacking the paper piece template to the center of the fabric, you fold the fabric over it and baste the fabric in place.
The paper template acts as a stabilizer which doesn’t allow the fabric to stretch on bias seams.
This is one reason it’s a wonderful technique for using up some of your smaller scraps!
This also allows you to fussy cut intricate designs and shapes out of your fabric to use in your paper piecing pieces.
Foundation paper piecing involves the use of a separate piece of fabric or paper used as a base in the piecing process.
It can be pieced onto or serves as a guide to stitch along and can be used to create pre-sewn units for more piecing.
An example of foundation piecing or foundation paper piecing would be crazy quilting, string piecing, pieced Pineapple quilts and Log Cabin quilts.
Sometimes the foundation is removed such as when paper is used, other times it is not removed such as when fabric is used as the foundation.
Precision and stability are the biggest advantages for using foundation paper piecing.
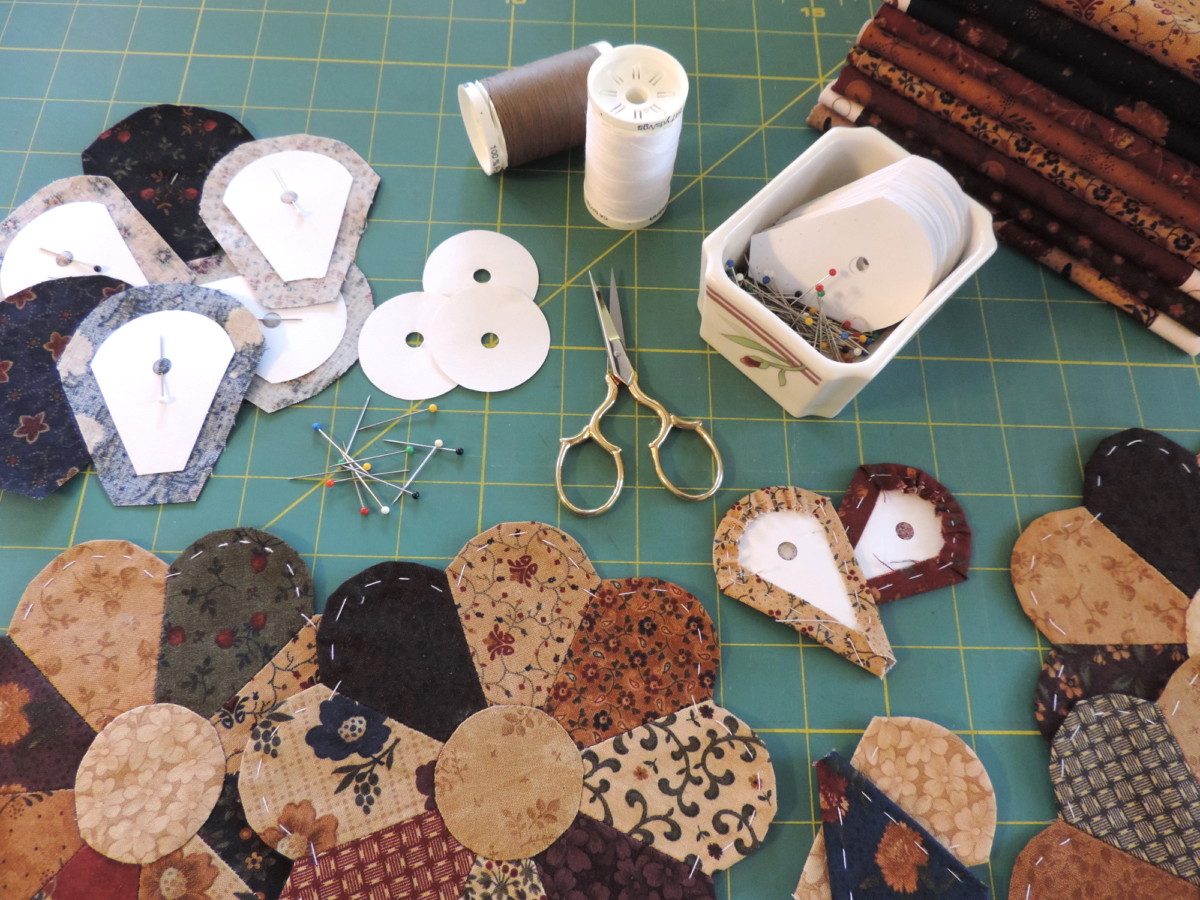
What Do I Need To English Paper Piece
English paper piecing doesn’t require many items which makes it so nice as a portable on-the-go project!
Throw everything into a small bag and you are set, ready for those times when you might need to wait for kids, while traveling or virtually anywhere you need something to keep you busy!
To English paper piece you need the fabrics that you will be using for your pieces.
Quilting cotton is a recommended fabric to use because of it’s weave being a little less tight than other fabrics.
This makes it easier to ‘needle’ the fabric allowing your needle to slide through the fabric much easier than others.
You can certainly try other fabrics but keep in mind that it will be much easier to pass your needle and thread through a fabric that has a little more open weave.
It’s a good idea to also keep in mind what your finished English paper pieces will be used for, using the appropriate fabric for that project.
You will need some pre-cut paper templates (or ones you have made) of different shapes to wrap your fabric around to construct the shapes and designs that you want.
You can find (or make) diamonds, hexagons, squares, circles or triangles for instance.
You will need contrasting and/or matching thread,
Contrasting for the thread basting so it’s easier to see when removing the thread later.
And matching for easier blending of your whip stitches when sewing the pieces together into their shapes.
Some English paper piecers simply use a white or ecru colored thread for sewing the pieces together.
While others like to use a matching thread instead.
The choice is yours as to what you would prefer.
I like to use a matching thread for sewing the pieces together using a color that matches the best.
Choosing a thread that matches the darkest fabric will usually allow the thread to hide a bit better when sewing the pieces together.
Naturally you will need a needle, a needle that is strong yet easy to sew with.
A needle that does not bend too much and won’t be poking your finger with the eye of the needle if you’re not using a thimble is the best choice to use.
Many English paper piecers find that the John James Milliners/Straw Needles size 10 (link to read reviews on Amazon) work really well.
Other paper piecers like Richard Hemming Milliners/Straw Needles size 10 (link to read reviews on Amazon) that also work nicely.
But you need to use the needle that is easy and comfortable for you.
You will also need some sewing straight pins to pin the fabric to the English paper piece template.
I like to use Dritz Dressmaker pins (link to read reviews on Amazon).
Dritz is a wonderful product and these pins are smooth and sharp.
And also come in a handy little reusable plastic storage box to keep your pins safe.
Last but not least, you need a small pair of sharp scissors to cut the threads.
I like to use small embroidery scissors for my hand sewing projects.
I’m afraid I’m a sucker for scissors, there are so many cute little scissors out there to choose from so I have a few different ones!
One of my favorite little scissor is the Gingher 3 1/2″ Embroidery Scissor with it’s own sheath (link to read reviews on Amazon).
It’s not only cute but it is a really sharp little scissor and easy to use.
If you decide to make your own paper pieces you will also need a pair of paper scissors too.
For those newbies to sewing its good to keep in mind that scissors used for paper get dull.
Paper scissors aren’t great for cutting fabric.
So always cutting paper with a nice regular pair of scissors is best for paper, keeping your wonderfully sharp scissors for sewing projects only.
What Type Of Paper Is Used For English Paper Piecing
The type of paper that is good to use for English paper piecing is paper that is heavier than typing or copy paper.
Paper such as using card stock or something similar.
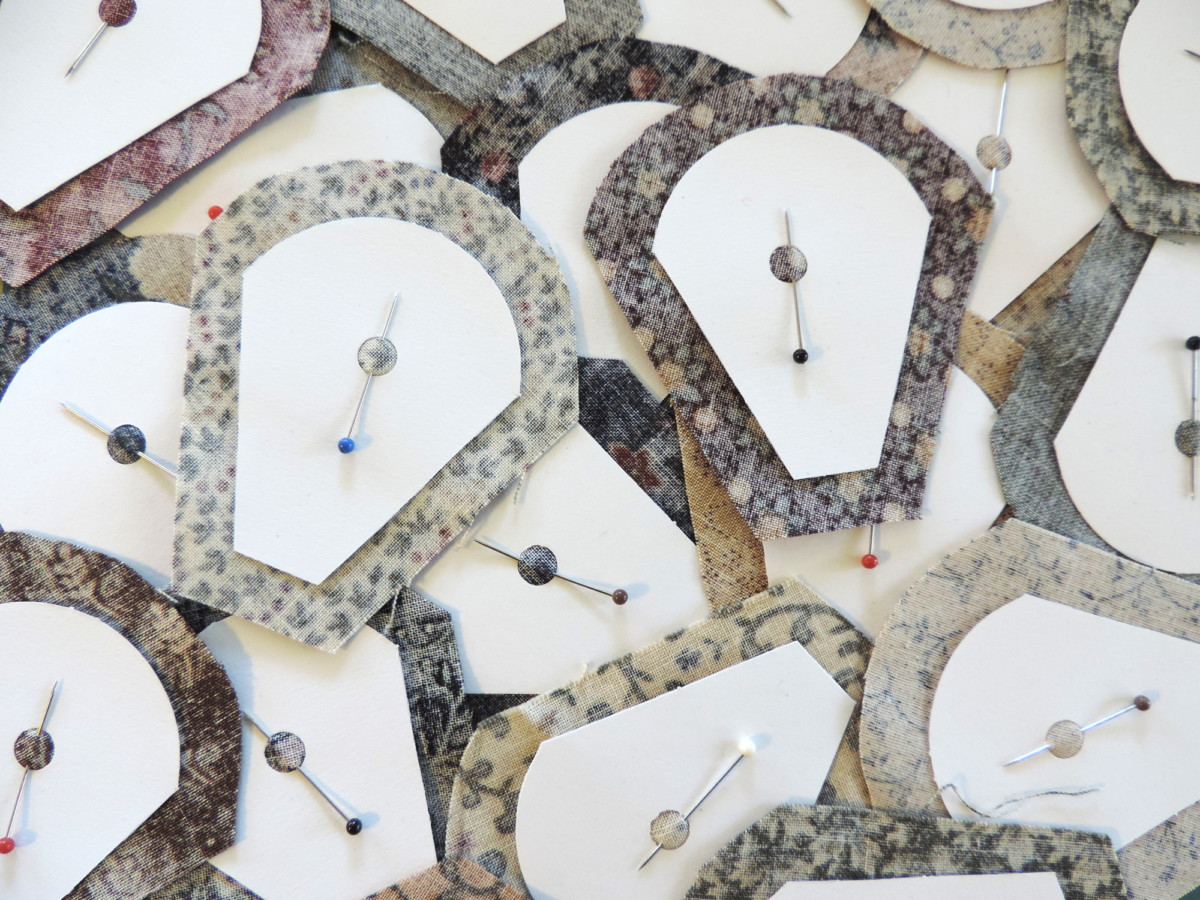
You can purchase precision pre-cut paper piece templates such as the ones I use made by Paper Pieces (link to read reviews on Amazon).
I like to punch a hole in the middle to make it easier to remove them when its time to.
I also find it easier to hold the fabric in place with a pin in the center to hold the fabric in place as I baste.
If you prefer, you can make your own paper templates pretty easily by printing the shapes onto card stock or similar weight paper.
You can go to a website called incompetech where you will find in the patterns section different shapes to print out that can be used for English paper piecing.
They have shapes such as squares, hexagons, diamonds or triangles.
On their site you are able to scale up or down to the size of shape you want to use.
The smaller the template you use, the slower will be the process of piecing them together so keep that in mind when you choose your sizes.
Depending on your project and the size of it, you will need lots and lots of paper piece templates.
The reason is because these paper templates need to stay in place until you have sewn several into larger sections.
Keeping this in mind helps you to decide whether you would like to make your own or purchase the pre-cuts.
And as always, remember not to use your sewing scissors on the paper!
Only use scissors you have for cutting paper as paper will really dull your fine sewing scissors!
In my search I also found Sonia on Flickr with lovely images for each step of how she bastes her hexagons.
She also has made a document for 1″ hexagons that is free for you to download and then print your own templates.
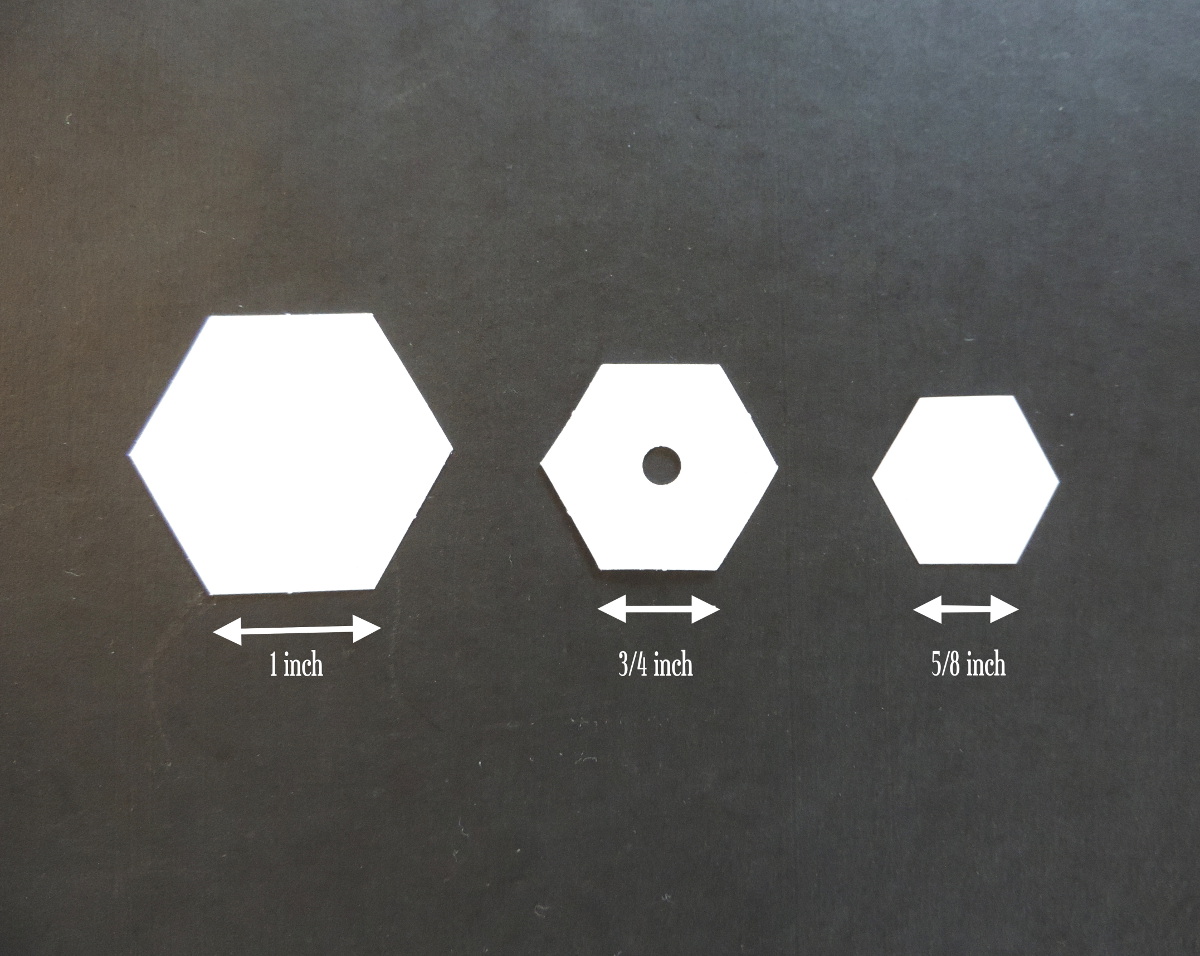
The length of one side from one point to the other point of your paper piece template determines the size of your paper piece.
Not the diameter of the paper piece template.
In other words, a 1 inch hexagon will have a 1 inch side from one point to the other point.
You can put different shapes together to make your finished project.
When adding different shapes such as diamonds and hexagons as an example, you need to make sure that one side of each shape where it will butt up to the other shape needs to be the same length.
There’s no need to be concerned about seam allowances since the shape of the paper template is the size of the finished English paper piece that has had the fabric basted to it.
The Best Thread To Use For English Paper Piecing
What type of thread is best to use for English paper piecing is an interesting subject.
I have found that the thread types or weights vary depending on who you are asking.
I find it best to use a fairly strong thread for basting and a finer but strong thread for sewing the pieces together.
For me, I have found that using 100% polyester Gutermann thread (link to read reviews on Amazon) in white, ecru or any contrasting color works just fine for when I am basting the fabric onto the different English paper piece templates.
I have more of this type of thread since it’s the thread that was recommended to use in my sewing machine so it’s convenient to grab.
I do find the Gutermann thread is easy to see and therefore easy to remove when it’s time to take out those basting stitches.
You can however use pretty much any strong thread you might have on hand as these threads will be removed after sewing the English paper pieces together.
For stitching the paper pieces together, try Superior Threads Bottom Line Thread (link to read reviews on Amazon).
This thread is a bobbin weight thread, a superior thread that is strong making it a wonderful thread to work with for English paper piecing.
It’s a great thread to use in the bobbin when sewing but it is also wonderful to use for hand sewing your binding on quilts, piecing quilts, doing embroidery and applique.
I use Superior Threads So Fine when machine quilting my quilts on my longarm so I’ve experienced just how wonderful Superior Threads are!
The best color of thread to use when you are stitching the English paper pieces together into their shapes, for me anyway, is always a color that will most likely disappear.
Sometimes these little stitches can show a tad bit depending on how tight you have pulled the thread when sewing.
Or how much of a bite you have taken with your needle.
Being a perfectionist I’m kind of picky I guess.
I don’t like my stitches to show if I can help it.
Sometimes they do show just a tad which makes it a definite handmade item, something I do cherish though.
I share more about a better way to stitch your pieces together later.
Using a color that closely matches the darkest fabric of your pieces that are being sewn together will usually help to hide your thread.
I have found that if you are having a hard time deciding on what color to use because nothing seems to work, a lot of the time grey will be the one to blend in better than other colors.
So you might give grey a try if you can’t find what will blend in well.
I have read that some English paper piecers like to use a silk thread when sewing the pieces together.
But I found that it seemed to break and wear out faster for me.
It’s definitely a wonderful thread though so maybe it would be just the right one for you.
Using the finest needle for the size and type of thread you choose to use will also help make the sewing of the pieces together a more successful process.
To learn more about the different types and uses of thread, there’s an article I wrote about thread titled, “What’s The Best Thread To Use For Quiltmaking?” that you will find interesting.
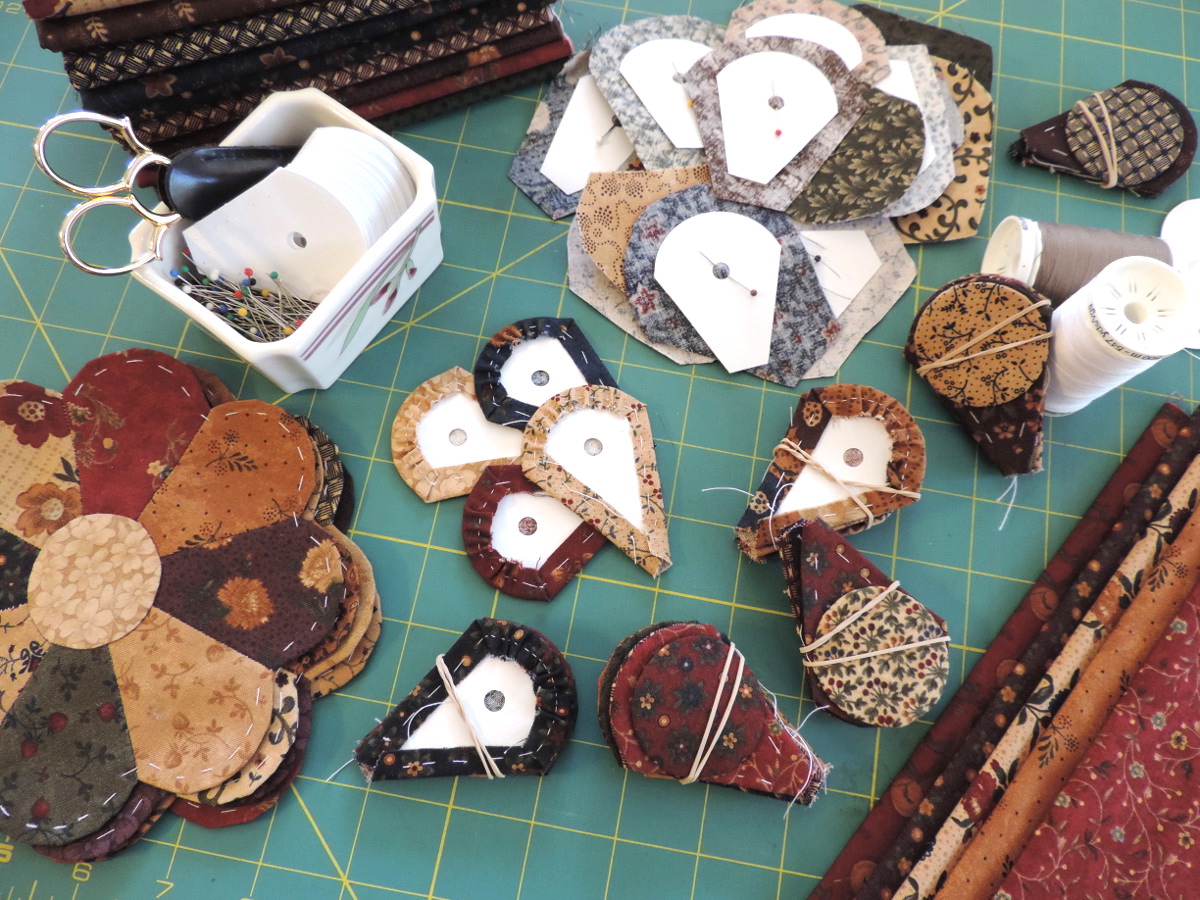
Different Basting Techniques For English Paper Piecing
There are different techniques when it comes to basting your fabric to the paper piece templates.
When I first started to learn English paper piecing I used the basting method, sewing through the fabric and paper template.
It works very well to keep those fabrics on the paper piece templates.
I found a short little video on how to quickly and easily thread baste hexagons to the English paper pieces to show how it is done.
This is by no means the only way to do it.
There is no right or wrong way to do English paper piecing.
Finding the easiest method for you will make English paper piecing fun and enjoyable.
Later on in my English paper piecing adventure I found another way called the tack stitch that I like much better.
You can also baste using a washable glue stick that makes for faster basting of your pieces.
I like tack stitches much more than basting or even glue, because the tack threads never need to be removed.
Basting using thread sewn through the template must be removed, and that’s a laborious step.
Although there are times you can’t avoid the thread basting way, for instance when using a Dresden plate shape with its straight sides and rounded end unless you are using glue.
Glue provides zero support after the papers are removed although it can be a nice way to baste.
But tack threads stay in forever providing some light structure even after the papers are popped out.
Which can be very useful if you want to remove papers early, such as when finishing an edge.
Usually you don’t remove the paper templates until all the edges of a piece have been sewn to another edge.
Otherwise you have lost the shape of your piece.
If you do decide to chance taking the paper piece out for whatever reason, I would definitely press the piece with an iron to set the edges better.
But it’s not recommended to remove the paper templates until all edges are surrounded with another piece.
I came across this little video by Crafty Pod where she shows really well how to do the tack basting method that I use most of the time.
I love how easy this basting method is to do.
English Paper Piecing Without Sewing Through Paper
You can English paper piece without sewing through the paper when basting your fabric to the paper piece templates by using glue.
This technique makes it quick and easy when basting.
You do want to make sure to use the right glue though so you won’t damage your fabric.
Or you could make it almost impossible to remove the paper piece templates.
A good tip here would be to not do your glue basting whenever you are in hot temperatures as you could find the glue getting too soft and not sticking, allowing all your paper pieces to slip right out of the fabric.
To glue baste your English paper pieces quickly and easily, a glue pen works great such as the Sewline Water-Soluable Fabric Glue Pen (link to read reviews on Amazon).
It’s a quick convenient and effective way to hold fabric in place for not only basting your English paper pieces but for basting and sewing of any kind.
How To Baste An Outward Facing Curved English Paper Piece
Some of your English paper piece templates will have convex curves.
Crafty Pod shows an easy way to baste what might seem to be difficult convex (outward facing) curved pieces.
I like the way she made these somewhat difficult convex curves very easy to work with.
I’m actually using this technique of hers while working on some Dresden plate shapes for an upcoming quilt that I’ve yet to design and I must say, it is working beautifully!
Sewing Diamond Shapes
English paper piecing lends its self to so many different shapes.
That’s just one of the reasons that English paper piecing is so much fun to do.
The sky’s the limit when deciding on what shapes and designs you would like to create with these many different shapes.
I love how this video shows how easy it is to paper piece diamond shapes.
A Better English Paper Piecing Stitch
In doing a little research to find more ways to stitch the basted paper pieces together into the different shapes I ran across what I think is a better way to stitch them together.
Stitching shapes such as flowers, stars, pinwheels etc. instead of using the whip stitch the way we usually think of using it.
As I shared earlier, being a perfectionist, I don’t like the way that sometimes these stitches will show where the English paper pieces have been joined.
The more I think about it the more I think that at times I have used this method but just didn’t realize it.
Even though I know there will be times that there’s no way you can completely hide these stitches, I do think that this better way of stitching that Becky Goldsmith teaches in this video will really help to better hide those stitches if that is also your goal.
For a wonderful resource to add to your quilting/sewing library I would highly recommend you obtain a book by Diane of Crafty Pod.
Her book is titled, ‘All Points Patchwork: English Paper Piecing beyond the Hexagon for Quilts & Small Projects’ (link to read reviews on Amazon).
This is truly a valuable resource for everything English paper piecing!
You really should give English paper piecing a try!
You can use the finished shapes and designs to add onto pillows, quilts, bags and whatever project you like.
Give it a try and see how fun and relaxing it can be!